Feedback and Hand Review
After each decision you make in the trainer, IkaSolver evaluates your play against the solved GTO strategy and gives you detailed feedback. This page covers the feedback popup, severity levels, and the hand review modal.
Feedback Popup
When feedback is enabled, a popup overlay appears on the poker table after your decision. The popup shows at a glance whether your play was correct and how it compares to the solver's strategy.
Severity Levels
Every decision is graded on a five-level scale:
| Severity | Color | Meaning |
|---|---|---|
| Best Move | Green | You chose the highest-frequency action in the solver's strategy. This is the play the solver makes most often with your exact hand. |
| Correct | Teal | Your action has a non-trivial frequency in the solver's strategy (at least 3.5%). The solver sometimes makes this play with your hand - it's part of a valid mixed strategy. |
| Inaccuracy | Yellow | Your action has a very low frequency in the solver's strategy (above 0% but below 3.5%). The solver rarely makes this play, but it's not completely absent. |
| Wrong Move | Orange | Your action has 0% frequency in the solver's strategy, and the EV loss is moderate. The solver never makes this play with your hand. |
| Blunder | Red | Your action has 0% frequency and causes significant EV loss (2% or more of the pot). This is a costly mistake that the solver would never make. |
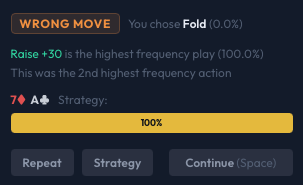
What the Popup Shows
The feedback popup contains several pieces of information:
- Severity badge - The colored label (e.g., "Best Move", "Blunder") in the top left.
- Your action - Shows what you chose and its frequency in the GTO strategy. For example: "You chose Raise 6 (34.2%)" means you raised to 6 chips and the solver does this 34.2% of the time with your hand.
- Best action - When your choice wasn't the best, this shows the highest-frequency action and its percentage. For example: "Call is the highest frequency play (52.1%)".
- Frequency ranking - If your action wasn't the top choice, you'll see its rank among all available actions (e.g., "This was the 3rd highest frequency action").
- Combo and strategy bar - Your exact hole cards are shown, followed by a colored bar representing the full strategy distribution for your hand. Each segment of the bar corresponds to an action, with its width proportional to frequency. Hover over a segment to see the exact action name and percentage.

Action Buttons
At the bottom of the feedback popup:
- Repeat - Deals a new hand with the same cards and board (a "repeat spot"), so you can try the decision again. This button only appears when a snapshot of the spot is available.
- Strategy - Opens the full GTO strategy grid for the current decision point, showing frequencies for all 169 hand classes. Useful for understanding the broader context of the spot.
- Continue (Space) - Dismisses the popup and moves on. You can also press Space or Enter on your keyboard to dismiss quickly.
Per-Hand Feedback Mode
When the feedback mode is set to Per Hand, feedback popups don't appear after each individual decision. Instead, after the hand is complete, the hand review modal opens with a summary of all your decisions.
Hand Review Modal
The hand review modal gives you a street-by-street breakdown of a completed hand. It appears automatically after each hand when using per-hand feedback mode, or you can open it by clicking on a completed hand in the hand history panel.
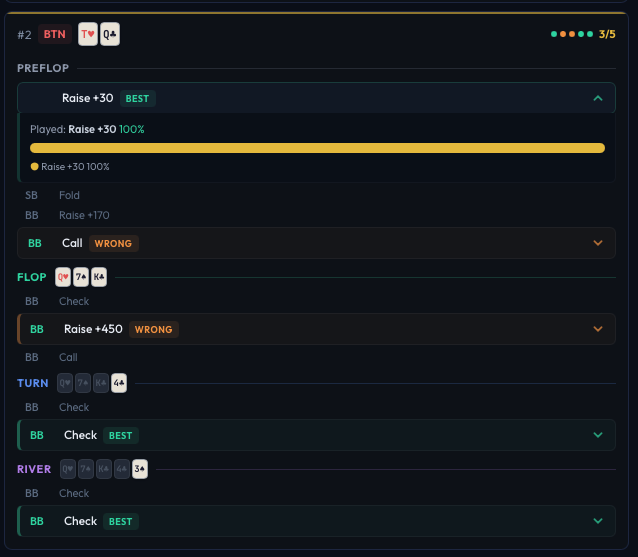
Header
The modal header shows:
- Your position (color-coded, e.g., BTN, BB)
- Your hole cards displayed as card icons
- Severity dots - a row of small colored circles, one for each of your decisions, showing at a glance how the hand went (green dots = good, red dots = bad)
Street Sections
Decisions are grouped under labeled street headers: Preflop, Flop, Turn, River. Each street section lists every action taken during that street by all players.
Each decision row shows:
- The acting player's position
- The action taken (fold, call, raise amount, etc.)
- For your decisions: the severity color, your action's frequency, and the best action if different
Click on any of your decisions to expand it and see the full strategy breakdown, including all available actions and their frequencies. You can also click Strategy on an expanded decision to open the GTO grid for that exact node.
Navigation
- Press Space or Enter to dismiss the modal and continue to the next hand
- Press Escape to close
- Click Continue in the footer